Cinderella & her Fairy Godmothers

I just wanted to add these fantastic ATCs of Cinderella and her Fairy Godmothers which I received the other day from my lovely friend Sandra Buchanan. She sent them as a surprise as I wasn't feeling too well and she wanted to cheer me up a bit.

Well Sandra you certainly did that, they were a beautiful surprise and made my day, so thank you very much xx

30 Days to go........

Well I think I have broken the back of my Christmas cards now. I only have 3 left to do yippee !!! I just hope I didn't forget anyone.

I as mentioned in a previous post I chose trees as my main theme this year as I wanted to do something totally different and not so traditional. Here are a couple more of the cards I have made using My Create a Scene Tree stamps by Sheena Douglas.


On this card I stamped the tree and then created an aperture which I backed with acetate and a lovely gold frame to hide the sticky bits.

I then inked a square on the inside to match the aperture, using my trusty waterfall big 'n' juicy ink pad. Then to finish off I stamped and embossed the greeting and snowflakes and glittered the lovely tree with clear holographic glitter to give the feeling of frosty snow.


For this card i decided to stamp Christmas music straight onto the White felt card blank using Tim Holtz Broken China Distressed Ink pad. After that I created the faux aperture using my big 'n' juicy ink pad and my giant dauber. To create the effect of the aperture I went round the square with a stardust Sakura gelly roll pen after i stamped and embossed my tree. You can do this with any type of pen but as this is a Christmas card I though the Stardust pen would look good. By adding brads to the corners it gives you another fab look of faux matting and layering.

To finish off I glittered my tree once again then mounted the whole card onto Blue holographic mirror card before mounting that onto the main card blank.

31 Days to go... Time is definitely just whizzing by !!!

Can you believe it there is only 31 days to go before Christmas is here. I can't believe just how fast time seems to be whizzing by these days. So much to do and so little time...

I have been busy trying to get the Christmas cards finished so today I thought I would show you the end results to the previous toppers I showed you.


This is the little fold out mouse topper. For the card base I added some Christmas velvet ribbon in dark green (Christmas trees) and Burgundy (the stars) with some gold cord to tie it all in. Sadly my photographic skills aren't up to and the end result doesn't look as good here as it does close up.


And here is the finished Magnolia Tilda card. I made an easel card for this one which I stamped with snowflakes all over. For the base I also stamped snowflakes but this time onto silver paper an i embossed the greeting. To finish off I added clear rhinestones to all the snowflakes on the topper and a couple of red rhinestones so the front stayed upright.Again my fab photography doesn't show the bling on this card too well.

47 Days to go and counting.........

Oh my time is just whizzing by these days. Had a really bad poorly day yesterday but thankfully although not 100% I am feeling a lot better today. Sometimes wish I could put myself in a bag and give myself a good shake up LOL :O)

Anyway here is the next topper I made for my Christmas Cards. I got this set of Cute Companions ages ago and never got round to using them, so I thought I would give them a go this year. They turned out really cute although I say so myself :O)


This is the front of the topper. I stamped out each mouse making a total of 4. I coloured them in using my promarkers and sakura stardust pens. Once everything was dry I cut out a circle of acetate to fit each bauble and attached it to the image. 

After the acetate had dried I attached the coloured in bauble tops before attaching each bauble to a page in my little booklet. I finished off each page with some pretty peel offs and a Christmas message on the last page. I then added a ribbon to close the booklet before attaching the whole thing to my topper backing that was mounted on holographic brushes gold mirror card.

And to finish off I made some glitter Holly and berries for each corner.


This is the front cover underneath the ribbon.


And these are the 3 inside images, I couldn't fit the greeting page on but I hope you get the idea.

50 Days to go..............

Right then here's another idea for my pending Christmas cards... This is just the topper for now. Hopefully I will get the rest finished over the weekend.


 I quite enjoyed making this topper. I used my Big and Juicy Waterfall ink pad again for the background. Then I stamped my Christmas tree which has been glittered with clear glitter for the bling factor. You can't have a Christmas card without bling now can you?

Once I had finished the background I stamped this lovely Tilda Stamp in Momento before colouring her in with Promarkers. I coloured in the fur around the hat, the boots and Tilda's angel wings with a clear sparkle Sakura pen. Once everything was throughly dry I glazed the Red coat, love heart and hat with Glossy Accents. You would get the same effect from Crystal Lacquer.

I think this one will be for one of my lovely nieces who live in Holland. And I am in the throws of making another one which will be great for my other niece.

Christmas is almost upon us....

I can't believe that Christmas is just 51 days away, yikes!!!!! And I haven't made even one Christmas card yet... I think I had better get my skates on or else Christmas will have been and gone before I know it LOL...

I have been playing around with a few ideas to make something totally different this year for family and friends. I love the traditional style cards but I thought something more modern might be in order this year and it has to include trees as I just love trees.

Anyway I tried out an idea the other day and here's the result.


You can't really see from this image all the lovely glitter on the tree, it looks really effective in the flesh. To make this one I used my spellbinders to cut out an aperture and placed that over my card stock. This is some fabulous heavy weight white felt card. I then used my Big and Juicy Waterfall ink pad to ink the centre of the cut out aperture. The finished effect looks a bit like Christmas tree baubles but I am afraid my photography isn't up to much so you can't really see that very well.

I let that dry before stamping one of the fabulous naked trees from my create a scene trees stamp set by Sheena Douglas. And I then stamped some lovely snowflakes before going to town on the tree with some clear sparkly glitter. I stamped the sentiment directly onto the card but didn't really like the one I used very much so I remade the sentiment using a better image and added it on using 1mm foam pads to give it a little bit of a lift off the page.


I finished off by mounting the whole image onto brushed Silver holographic mirror card then onto my White Felt card base.

Another ATC that I have received recently.

Just thought I would upload another of the ATC's that I have received recently. This one was for our 'N' Swap and was sent to me by a lovely lady called Pamela. The title is - N is for Necklace and the ATC is lovely in the flesh so to speak.


November brings the 'Q' Swap so I am racking my brains to find something different to do. There is the obvious ones like Queen & Questions but I fancy something different this time round. Hopefully I will think of something Quirky :O)

ATC's I have received

Well as promised in my last update here are a few of the fabulous ATC's that I have recently received from my friends. I hope you like them.


Mum and I do a little ATC challenge between us each month and here is mum's version of Autumn. I just love the little squirrel nestled in the leaves. Really pretty for mum's 2nd attempt at an ATC.

This super ATC was sent to me by my friend Sara for this months "P" Swap the details is fab.

ATC Swaps

I joined an ATC swap group a little while ago and so far I have had some lovely ATCs sent to me from the other members. I never thought I would enjoy making ATCs but so far it has been great fun and I am now trying to get my mum interested too.

Here are just a few of the ATCs I have made and later in the week I will add a few I have received. I hope you like them as much as I enjoyed making them.


This first ATC was for my N Swap. I made by stamping onto stampbord and once dried I etched out some of the light and the stars. I named this atc Night Sky. I used a brayer and a big and juicy waterfall ink pad for th background and I stamped the trees with Black archival ink pad.


This was for my O swap. I started off by using Dried Marigold distressed ink and Spiced Marmalade to colour the background. I then used different colours of Orange to stamp the letters to spell ORANGE and I embossed them with clear embossing powder. I then took a piece of White Organza and changed it to match my atc using Promarkers.  I then added a few buttons and gem stars to finish the atc off.
This next atc was a variation on my P swap. The original had just 3 ribbon roses where as for this one that I made for my mum I made 5 faux porcelain roses from paper. Once the flowers were made I dipped them into my melting pot to give them that porcelain look. The atc base was coloured and stamped using Tim Holtz distressed inks and I finished off by adding a few rhinestones.


 I'm looking forward to the next atc which is Q, but I haven't decided what to do quite yet.

Autum Foliage & Create a Scene Trees

I just love this time of year, all those fabulous colours of Autumn are just magnificent. I recently made a little card for my mum using the Create a Scene Trees stamp set by Sheena Douglass and also using the Autumn Foliage stamps by Rubbernecker Designs.

I started by creating the coloured background using my stamping up dye based ink pads. I then stamped the leaves all over in a contrasting colour but a little faded. And then on top of that I stamped my bare trees in a fabulous rusty colour. Once the car was dry I used glossy accents to highlight the faded leaves and I am so pleased with the look as it makes the leaves just pop out of the page at you.


Once everything was dry I added a lovely dobby ribbon to close the card with and stamped another tree image on the back where I placed the sentiment. I then made a matching envelope which was stamped with the leaves.


After I finished the card I decided to make an ATC to go along with the card, mum and I have started to swap ATCs recently so I thought this would be nice to go with the card I made for her. I made the dangly from shrink plastic and beads and finished the corners off with brads.  made 2 ATCs as I couldn't decide on the colours to use. The spare one was sent to a friend who is in the same ATC club as I am.

Time just flies....

Can you believe yet another month has flown by since I last posted on my blog. I have no idea where the time goes. I do know that it feels like the older I get the faster the time goes.......

I think I need to invest in the software that types for you as you speak, I could do more things at the same time and would probably find more time to update my blog. I just wish I had more happy things to write about but at the moment that's not going to be the case as it would seem that Cancer likes the members of my family both near and far.

First it was me and now my partners mum has been diagnosed, her father is also suspected of having it and my sisters father in law is currently going through all the tests. So this 1 in 3 malarkey is not so in my family circle. Life can be so unfair at times...

Anyway on a brighter note things over at Crazicards.co.uk are going well. The site seems to be picking up a little and I am slowly but surely getting more products loaded up and even more are on their way. I am also working on a new gallery where I can upload my projects and I am hoping to have a section where all the customers at Crazicards.co.uk can upload their own art work for everyone to see, it's going to be great. All these things take time though so for now I have created an off the shelf gallery where I will be uploading some of my crafty projects. You can visit my temporary gallery by clicking the link here, I hope you enjoy your visit.

I know I have promised to do the box tutorial several times so I am not going to make any further promises as to when it will be ready to view, things are just to mad here to be able to say it will be ready any day soon. So I will just say that it is in the process and once I get some breathing space I will get it finished I promise....

It's been a while.....

Well doesn't time fly.  So many things have been going on in this neck of the woods that sadly the blog had to go on hold for a while.

So what's been happening? Well I continue to recover from my cancer operation and treatment. It's been 2 years since my operation and 18 months since the treatment finished and after dealing with the side effects caused by the treatment and medication I am now moving along quite nicely.

Still have a few issues going on but hey that's life and they will sort themselves out eventually, I hope lol :O) If not then they will be dealt with as and when I guess :O)

On a sadder note my partners mum is currently dealing with cancer and due to her age and the type she has it's not the outcome we wanted. She is in our thoughts constantly.

On a happier note the Crazicards website is coming along well and the site is up and running on my new host without any further downtime issues thank goodness.

I have just uploaded Martha Stewart punches and Tim Holtz goodies so please feel free to drop by. You can even say hello as I have now got live online help setup and working. I still have a huge amount to be getting on with but I am adding new products all the time and I am also working on a new gallery and a few project sheets for downloading. You can find the website "here", I look forward to seeing you soon.

I also need to mention the box project I promised a while back, I haven't forgotten and it will be here within the next week, all being well.

Here's a few projects I have done recently:

This card was inspired by a tag I saw in the Craft Stamper magazine, I just love trees and the Crafty Individuals Hug a tree Stamps a just divine. I changed a few elements from the articles tag design and attached the tag to a card blank.


This next card was made using the Elusive Images patchwork butterflies stamp plate. The butterfly is 3D and has glossy accent elements on the wings and body and I made the antenna out of waxed cotton.


This next project was a complete 1st for me. I made the Arty Farty Colin Car as a wedding card for a family member. I totally enjoyed making it and have had an idea to stamp all over the next one.


Just a quick card for Summer

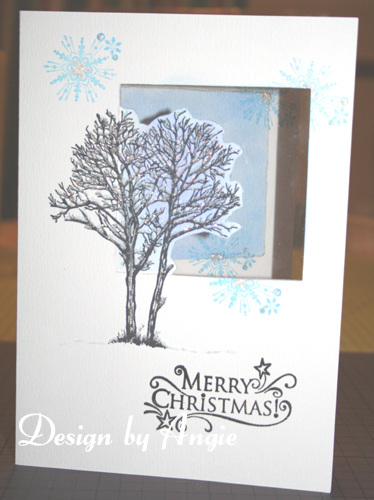
Well as I haven't yet had the chance to get my tutorial up and running I thought I had better upload a nice little card I made the other day from a new lot of shaped cards I have just got.

It's not normal for me to try a different shaped card, I usually stick to the straight edged boring shapes LOL so this quite suprised me when it turned out like this:


This is a DL card with a wonderful curved front. And it also came with an oval plain topper and an envelope. 

I covered the front with some pretty Summery coloured paper I had in my stash, you know, one of those sheets you buy then have no idea what your going to do with it, or you decide to put it away safely as it's too lovely to use. 

Anyway after my wobbly cutting out I decided I had better edge the whole front with peel off's, afterall little white edges isn't the preffered look is it.....

I then decided to add some colour to the topper and edge that with my Gold marker. And to finish off I used a fab butterfly topper I made a short time back. You can see it better in this photo: 


I coloured the flowers and butterfly with my Sakura Gel pens then glazed the whole butterfly with 3D glaze which really set it off nicely.

I finished off with a contrasting panel and some 3D flowers and left the inner panel blank until I can decide whether to add another panel or leave it blank.

Anyway enough from me for today, have a lovely Bank Holiday Weekend.

I have entered this card in the "Sunday Stamper 100" competion, make sure you pop on over to check out all the fab entries, there is some great talent out there :O)

Can you believe it's April already...

Well I just don't know where the time goes. One minute it's January and the next it's April already and I will soon be 40 something.........

The new website is coming along a treat, although my service provider has been a big nightmare over the last week. The database server went down and no matter what you say to them they were oblivious. Anyway they eventually listened and everything is back up and running now thankfully.

So if you haven't been to visit already please feel free to come take a look and tell me what you think, all critiques welcome good or bad. You can find me here.

I recently decided to have a go at making an exploding box. I have seen many different versions of this type of box and I will be posting my version here along with a tutorial how to make a similar box once I get the wording right so that everyone can understand me that is LOL.....

I'm really pleased with the end result so pop back soon to read all about it.

Right enough from me Happy Easter.

Milestone Birthday Card

I used a set of Get in Shape Chunky Numbers to make the layers for my card. Then I stamped music all over as the person this is for is heavy into Northern Soul music. I embossed the music in Gold. And then I decided to stamp the base with a large Happy Birthday backgound stamp using versamark again but this time I decided to use some pretty sparkly Gold perfect pearls.

After layering everything up I mounted everything onto Gold mirri board.  I always find it hard to make a card for a man but I think this one turned out ok.

I have entered this card into the Polka Doodle Special Birthday Challenge #10 this week.

Beautiful Butterflies


I stamped this beautiful butterfly stamp several times using a stamps away British Butterfly Stamp.

Once I had stamped enough to make decoupage I painted everything using cosmic shimmer and H2O paints.


Once dry I cut everything out and put everything together. Before using my rollergraph to create the fancy border which I embossed in gold. I also added a few gems to the flower centres here and there to add some extra bling.


You can't really see the way the gems sparkle when the light hits them but they look fab sparlking away along side the cosmic shimmers. I love the way this card turned out and will definately be using this stamp set a lot as I love butterflies.

I have entered this card into the following challenges:

Flutterby Wednesday #100

Secret Crafter Saturday Challenge #74 - Anything Goes

Daisy May Challenge - Anything Goes

Rosie-D's Challenge - Spring

The Pink Elephant #58 - Spring 

Stamp Something - Cream & Green Challenge

Hummingbird and Origami Flowers


Just wanted to add a new card to my blog and it seems that it will hopefully also be one I can enter in the Polka Doodles challenge and one or two others too this week which is great. I am also an avid stamper and wanted to do something that involved stamping and origami flowers. And this is what I came up with.


I stamped the hummingbird and flowers with versamark then embossed them with detail White Opaque embossing powder.


Then I attached the vellum to the Black mat with brads which I had coloured to match, I only had purple to hand, and then added the black and white oragami flowers with half pearls to finish off. Oh and not forgetting my favourite spotty ribbon. I am well pleased with this card, I hope you like it.

Handmade Origami Flowers


Here we are with another card. I thought I might try making some origami flowers and this was the result. They turned out quite well and I will definitely be having another go at making different sizes and shapes.


I started off with some scraps of pretty patterned papers which I distressed with my ink pads. You have to make each petal seperately then stick them all together so it took a little while to do but I think the time it took and the end result was work the effort. 


I chopped off the bottoms and added the brad with a big blob of silicon glue to give them a bit more strength on the card. And finished off with the gold ribbon and sentiment. So my conclusion is making your own pretty flower embelishments is well worth it. I will be trying some other techniques out in the next few weeks and will report back with the results.

Promarkers are ACE

Well I finally got round to having a play with the promarkers I bought some time ago and I am addicted LOL....

Here is a card I made using them on a Sugar Nellie stamped image I did some time ago on Watercolour paper. I used Archival ink to stamp this image which is not the right one but I thought I would still have a go.


I think i need to practice my colouring skills but it was great fun,  and I will definately be collecting all the colours so I can play some more.......

Crazicards Craft Supplies Is here... at last

Quite some time ago I had a notion that I wanted to start crafting again but due to work commitments I was too busy to even think about it.

Then in June 2008 my life was turned upside down after a visit to the doctors several months earlier for dizzy spells turned out to be Cancer just under my right ear. Totally unexpected this knocked me right off my normally sturdy little feet. But I made a vow that same day that I wouldn't let Cancer beat me and after a rather bumpy rollercoaster ride I am still here 19 months later although a bid worse for wear LOL.

Once I got through my operation in July and was well into my radiotherapy I decided that my life had to change and that I needed to concentrate on me more rather than my business. And that I needed to find a more relaxing less stressful job that benefited me more. So I started thinking about what I might want to do and then the light bulb went on one day, I love to do arty things and cards so why not have a craft business.

Anyway to cut a very long story short whilst I continued with my treatment and then the recovery afterwards I was planning in my mind the how's what's and why's of my new business and I also had to think of a logo and the main thing a name for that business.

And that is basically how Crazicards Craft Supplies was born. It's been a long time in the making but I got there in the end. So if your reading this message please take a few minutes to pay me a visit or tell a crafty friend where to find me. I am adding new products on a regular basis so hopefully there will be something for everyone.

Onwards and upwards as they say, have a great crafy weekend.

Angie
x

Related Posts Plugin for WordPress, Blogger...