Showing posts with label Tutorials. Show all posts

Parchment Christmas Tree Tutorial

I just love parchment but have yet to master the traditional way of parchment crafting. Some of the works of art that I have seen, and they are most definitely works of art, must have taken forever to create as they are so beautiful and intricate.

This week I thought I would show you a a different way to use Parchment to make a Christmas Tree Card.

The effects you can achieve are fabulous and all you need  are a few items to create a fantastic looking card like this one.


What you will need:

Parchment
Stamps of your choice
Scissors
Versamark ink pad
3D glue gel
Green Pearl wow powder
Brown Kraft paper
Peel off stickers
Felt Card for your card base
Gold mirror board
Embossing tool
Embossing mat
Hougie board
Glitter pens
Craft knife
Rhinestones

Step 1


First of all you will need to stamp out several trees with Versamark ink and emboss them all with Green Pearl WOW embossing powder.

Then cut them out ready for step 2.


Step 2

Take one of your tree and place it onto your embossing mat face down.

Now take your embossing tool and gently emboss the back of the tree following the stamped image. This will give you a 3D effect to your trees.

You need to do this with all of your trees.


Step 3


Once you have embossed all of your trees you will need to cut them all out.


Step 4

Next you need to create you main back ground. For this I chose to create a snowflake background.

To do this you need to stamp your snowflakes stamps on to your parchment sheet several times using Versamark ink.

Then take you embossing tool and gently emboss over the Versamark ink as shown in the image to the right.


Once you have embossed all your snowflakes turn over the parchment and there you have a fabulous background ready for your trees.

Mount this onto your brown Kraft paper background and edge with peel offs.

Step 5

Next you will need to start putting you card together.

To do this I tore some strips of parchment paper to make hills for my trees to sit on.


Note: Make sure you tear the parchment carefully as it can run away from you.


Once you have composed your scene using the 3D glue gel, add a sentiment by stamping in versamark then embossing it from the back to ensure the writing is the right way around.


I added a few rhinestones to give my snowflakes a little bling and mounted everything onto your Gold Mirror board.

And there you have it a parchment Christmas Tree card with a difference.

I hope you enjoy having a go at this as it is so much fun and you can do it with any of your stamps, just play and have fun.


Until next time then,  Happy Crafting xxx


Christmas Tea Light Lantern Tutorial


For this weeks tutorial I thought I would try something a little different. So I decided on this little Christmas Tree Tea Light Lantern that you can use as a table decoration.

What you will need

Hougie Board or similar
Cuttlebug or similar
Metal Edge Craft Ruler
Craft Knife or Scissors
Spellbinder Dies
Various ink Pads
Glitter or Crystals
Water Spritzer
Kitchen Towel
Paintbrush and water
                                                     Adhesive Tape or Tape runner
                                                     Scrap Paper and masking tape
                                                     Glue
                                                     Foam Pads
Step1

Trim your plain white card down to 5 1/2" (14cm) x 10 1/4" (26cm)

Take your Hougie Board and place the card down (longest side first) and score at the following points, 2 1/2", 5", 7 1/2" and 10".
Next turn you card and place the shortest side to the top and score at the 1 1/2" line.

Fold and score all the score lines.

Place the scored card to one side, we will finish it later in the tutorial.


Step 2

Next you need to stamp out the images you want to have on your lantern. For this lantern I chose Christmas Trees.

I stamped out 8 trees in total, 4 large and 4 small.

I stamped these trees in Peeled paint Distress Ink.

Once you have stamped out all your images take a damp paint brush and drag out the Distress ink and colour in your images.

Once you have coloured them all in you will need to cut them all out

And then you need to add your glitter or Crystal's and set them to one side to dry.


Step 3

Now for the main body of the lantern. First of all you need to add some interest, for this I took a scrap of paper and tore a cross to make a hill, this was then stuck down over the card and inked above the line.

For this I used Broken China Distressed ink and a Blending Tool to colour in the skyline.

TIP: If you don't want to make your own background you can use pre-printed card stock instead.

Whilst the ink is still damp spritz some water over the top and dab with kitchen towel to make a snowy effect.


Step 4

Once the card is completely dry you now need to cut out your aperture's using the Spellbinder dies, for my lantern I used S4-169 labels but you can use any shape you wish as long as it fits your panels leaving a gap around the edges for the next stage.

Step 5

Now you need to cover the back of the aperture's with vellum or parchment, whichever you have to hand.

Make sure you leave plenty of space round the edges to stick the vellum down securely. For this I used my tape runner

Step 6

Next you will need to cut out sections at the bottom of you panels so that the lantern all fits together nicely once it is stuck together. Your panel should look like mine when you have finished.

TIP: Don't just cut a straight line up the crease, cut a slim triangle as this will give a better finish.

Step 7

Now to put the lantern together. Take some double sided tape and affix it to two of the flaps on the inside and one of the flaps on the outside (the one between the other two).


Take another strip of tape and place it down the thin side panel on the coloured side.


Stick the side panel to the edge first then fold in the two flaps that have the tape on then and stick them together.


Now stick the flap that has no tape on it, down, followed by the last one which does have the tape.


This will finish you lantern base off nice a neatly as shown in my picture.


Step 8

All that is left to do now is decorate your lantern with your stamped images.

Use your tape runner or double sided tape to stick the main tree and for added effect use some foam pads to the smaller tree.

Add your images to all four sides and there you have your finished lantern.

Caution: If your going to use a real tea light please be extremely careful that you don't set the lantern on fire.

To be extra safe use a faux battery operated tea light instead of a real one.

I hope you will enjoyed making your Christmas Lanterns, don't forget you can use any images you like to decorate the sides.

Until next time Happy Crafting xx

Teebag Folding Christmas tree Tutorial

This weeks fabulous tutorial was created by my guest crafter Pauline Jackson. And is an excellent idea for a Christmas Card.

What you will need

Pattered paper
Craft Knife
Craft Ruler
Bone folder
Coloured card Stock
Glue
Double sided Tape

Step 1

Take your patterned paper and cut out 11 4cm x 4cm squares using your craft knife and ruler.


Step 2

Take one square and fold corner to corner then repeat with all other 10 pieces then open and lay them flat.


Step 3

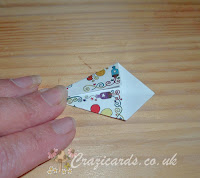
Now take your square and lay it pattern side down. Fold the left and right sides into the middle to meet up with the crease down the middle, this will make a kite shape. Do this with all 11 pieces.


Step 4

When you have finished they should look like this.


Step 5

Take a rectangular piece of card (colour of your choice) and draw a pencil line down the centre.

Then take 3 kite shapes and stick them longest point up onto the card so the tips are on the central line.

Fix another row of 3 kite shapes slightly higher up the card, they should all overlap the first layer.

For the next 2 rows stick two more kite shapes on top of these and you will see the tree shape take form. )Use the images as a guide)

Finally stick the last kite shape to the top. And finish off with a star or other embellishment of your choice. Next you need to create a bucket under the using a piece of scrap cad or paper.

Step 6

Mount your topper on to a blank card and add a sentiment and further embellishments such as ribbons and gems if you wish and then your done.

Here s a couple of cards I made following Pauline's great tutorial, by shaping the kites a little more or a little less you can see different effects to be sure to have a play so that you get the effect that you want.


For these two cards I used the Papermania - Wonderful Christmas 12 x 12 paper pack and a few pearls which I coloured with my Metallic Promarkers

Actetate Card Tutorial

Acetate is one of those things we all have in our crafty stash but sometimes don't know what to do with it.

So this week I thought I would show you a quick and easy Acetate Christmas Card.


What you will need


  1. Acetate sheet
  2. Coloured card stock - For this I used American Crafts and a small piece of White wash Coordinations with a pale blue core.
  3. Ribbon
  4. Rhinestones
  5. Christmas Snowflake mask or similar
  6. Cuttlebug or other die cutting machine
  7. 3D glue or foam pads
  8. Double sided tape
  9. Hougie board
  10. Sandpaper tool and Dust Buddy 
  11. Spellbinder Circle Dies or similar 

Step 1

Take a piece of coordinations card stock and run it through your cuttle bug along with the Christmas or Snowflake mask. Then cut out the sections you want to use for your card.

Step 2

Next I took my Spellbinders and cut out the circles that i wanted and sanded them down to reveal the coloured car.


Step 3

Next I cut out 3 different colours of Blue American Crafts Card stock to back my Snowflakes.

You can also cut out another set of plain circles to use on the inside of your acetate to hide the sticky tape or glue that you use to attach your Snowflakes to the front.

Step 4

Next I took my White Stazon Ink and a few different stamps and covered the front of the acetate.

This can be as full or as sparse as you like, I added a few swirls to give a little interest.You will need to set this to one side to dry as Stazon takes a little time to dry on acetate.

Step 5

Now you will need to add a piece of coloured card to the inside back cover of your acetate card.

I chose a pale Blue American Crafts card stock for this. And once again I cite a similar sized piece to use for the back of my card which is where I stamped the sentiment and wrote my Christmas message.

This hides the tape or glue from the front piece.


Step 6


All that was left then was to assemble the card using various bits and bobs such as ribbon, silver mesh material and rhinestones from my stash box.

A really pretty and contemporary Christmas Card that doesn't take too long at all to make.

I hope you will enjoy having a go at this card, if you do please send in your photo's to me here and I will add it to my blog for every one to see.

Thanks for popping by.

Until next time Happy Crafting xxx

Spotlight Technique


Continuing on with the theme of sprucing up your craft projects using small but effective features  today I am going to show you how to do the "Spotlight" technique.

What's is Spotlighting? I hear you say... Well by Spotlighting a small area on your project it creates the effect of magnifying that particular area of your project.

  What you will need:

Glass cutting mat
Cuttlebug or similar
Spellbinder circle cutting dies
Low tack tape and 1mm or 2mm foam pads
Stamps of your choice
Memento Tuxedo Black Ink Pad
Clear Wow Powder
Promarkers or other colouring medium
Luxury Felt Card , White card and Black Card
Embellishments of your choice

Step 1

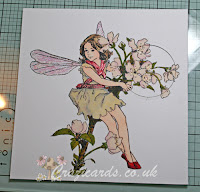
Choose the stamp you want to use for your project and stamp and emboss your image onto White card.

From you Spellbinder circles set select 2 small circles to use on your project, you can use larger circles if you wish, the choice is yours.

You then need to choose which part of your project you want to "Spotlight". I did this by moving my smallest Spellbinder, cutting edge down, around the image until I found the area I wanted to "Spotlight". Once happy I placed 2 small pieces of low tack tape on the edges of the die to hold it in place ready for cutting.

Step 2

Take your Cuttlebug and cut out the small circle from your stamped image.

Then take a small piece of Black card and cut out the largest of the 2 circles. This creates the mat for your stamped cut out.

Step 3

You will then need to colour in your stamped image.

I found the best way to ensure that both the cut out and the main image match is to pop the cut out back into the main image before colouring in.

For my image I used Promarkers to colour in my fairy and I used Sakura pens to glitter the wings and the sash.

I then used a Sakura glaze pen to highlight the flowers and I also glazed the glittered wings.

Step 4

Once you are happy with your image you need to put it all together.

First of all mat and layer your main image onto the main White felt card blank using the Black card.

Stamp your sentiment onto the card front directly, if your not comfortable doing this you can also create a separate sentiment and mat it with the black card also.

To create your "Spotlight" adhere the 2 circles together and use foam pads to lift the circle from the main image slightly.

This gives the illusion that the "Spotlight" area is magnified slightly.

Add your embellishments and your all finished. The key is to keep it clean and simple and not to over embellish.

I hope you enjoy trying out this technique, have fun with it and experiment with different size circles for slightly different effects.

Until next time Happy Crafting xx

Related Posts Plugin for WordPress, Blogger...