Just a small Thank you...

As some of my readers will know I was diagnosed with Cancer back in 2008 and thankfully things are going well on that front.

This year I wanted to do something to raise a little money for Cancer Research by selling Shopping Trolley Tokens and handmade items made by me personally.

One of the things I like to do when someone makes a donation or purchases one of my trolley tokens is to send a little thank you card along with the trolley token.

So this week I have been busy making a few more cards ready to be sent out. I decided on nice bright colours as the sun is shining and Summer is almost here. And I decided on the theme of flowers and butterflies as I love them both.

This first card was made by cutting out an aperture from a piece of copier paper then I used it as a stencil to make a coloured block background using a Big and Juicy ink pad, this one is Spice.

I then stamped and embossed a couple of doodle butterflies from Chocolate Baroque. And for effect I added a few little clear Rhinestones to each butterfly.

The second card was made by first of all stamping a leaf design directly onto the card using the same Big and Juicy ink pad.

I them stamped and embossed a fabulous little daisy stamp that I found in the bottom of my stamp box, I think I bough this one off eBay many moons ago. And to be honest I had forgotten just how pretty it was.

I then coloured them in using different colours again from the Big and Juicy ink pad and cut them out before sticking them to the card using 3D glue. I finished off with a Thank You stamp.

Nothing too flash but a quick, simple and effective way to say thank you to all my supporters for helping me to raise money for such a great cause.

If you would like to help me raise money you can purchase a shopping trolley token from my website fund raising page HERE. Or if you would like to make a donation straight to Cancer Research through my Just Giving page please visit my page HERE.


Thank you to everyone who has supported me so far, I appreciate your help more than you can ever know. Cancer research is such a good cause and every single penny counts...

So until next time Happy Crafting xx


Stamped & Gilded Art Deco Lady

I just love Art Deco ladies so when I came across the Debbie Moore Clear Stamps I just had to have them. This is the 2nd lady that I have and she is gorgeous.

This First card was a Mother's Day card. I stamped the Deco lady first onto plain white card using Momento Black ink and then onto clear acetate using Stazon Black Ink.

I then cut out just the dress and hat from the acetate image. And I also cut out the whole thing from the white card stamped image.

Once everything was cut out I coloured in the face and arms using my Promarkers and then used my craft knife to cut along the arms and around the hands so that I could lift the arms over the top of the acetate dress when I attached it.

I then took a piece of A5 Icory Pearlescent card cut from a sheet out of the Nocturne Pearlescent 12 x 12 Card Pad and scored diagonal lines from the bottom left to the top right leaving approx 1cm between each line at the right hand corner, this gave more interest to the background behind the Deco Lady.

I then printed a fabulous Art Deco flourish onto another piece of printable acetate and attached it to the Pearlescent card using gold brads. And then mounted the whole thing onto a piece of Gold holographic mirror board.

Next I used Variegated Red Gilding Flakes to cover the back of the acetate stamped dress and hat. And once they were dry I glued them to the stamped card image making sure to lift the card arms over the top of the acetate.


Once dry I was able to shape the dress quite easily before attaching the completed Art Deco Lady to the acetate covered base card using 3D Glue Gel.

The 2nd card was a birthday card for my sister. The Deco Lady was made in the same way as the first card except I used Variegated Green Gilding Flakes.

For the background I printed another fabulous Art Deco panel and I also used a fabulous Art Deco backing paper in Pale Green to co-ordinate with the gilding flakes. And I mounted this onto Silver holographic mirror board for a dramatic effect.

I finished off with a Big Sister Silver charm and some clear rhinestones. This is a beautiful stamp set and I just know it will get plenty of use.

Until next time Happy Crafting xx
Baroque Guild ATC Swap March 2011

The theme for this months ATC swap was Spring Colours with a theme of Pink and Fresh Green.
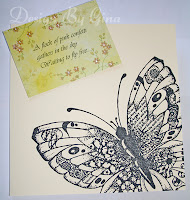
This is the gorgeous little ATC and fabulous card I received from Gina.The ATC is covered in beautiful little flowers and is really sweet. 

The gorgeous card that accompanied the ATC was a lovely surprise and was stamped using the Patchwork Butterflies stamp plate. 

This huge butterfly is just glorious and reminded me that I need to find my 6 x 6 acrylic block out and play with this stamp, soon.


This is the ATC that I made for the swap. I covered the ATC in bright green pearlescent acrylic paint before stamping the butterfly which is also from  the Patchwork Butterfly stamp set.

Once this was dry I coloured it in using my Promarkers. And then proceeded to add several layers of clear Utee to make an enamelled tile. This really made all the colours ping.

I finished off by adding a little gold embossing around the edge using Rich Gold wow powder. The end result was great and this ATC now has a lovely new home with Barbara. Next months ATC and Tag challenges have already been set and will be done under the new banner of Chocolate Baroque which is the name of the new company opened by Glenda Waterworth.


The Art of Zentangle

I just love to doodle, I doodle when I'm on the phone, I doodle when I am watching the TV, in fact I doodle where ever there is a piece of paper and I have a pen in my hand. It helps me to relax and it also helps me to focus.

I think everyone doodles at some point or another, did you ever scribble all over a page then colour in the resulting pattern with your crayons or felt tip pens when you were younger ? That's doodling too....

So what is Zentangle I hear you say, well basically Zentangle is a form of doodling. But instead of doodling nothing in Zentangle you doodle repetitive patterns to make beautiful pieces of art. And the beauty of Zentangle is that absolutely "anyone" can do it. Whether your 99 years old or 5 years old you can Zentangle.

It's fun and relaxing and you never get the same Zentangle twice unless you want to of course...

Zentangle is also an exciting form of art as you never know what you will end up with before you get started.

So what do you need to get started with your Zentangle?

Tools you will need: Good quality White card or paper, you can also use coloured card s you wish. And any fine liner pens, pencils, gel pens or felt tip pens you wish to use.

Not an extensive list of requirements at all really. There are absolutely "no" rules to Zentangle, it can be black and white or colour according to your own preference. And there are no set shapes or sizes. So you are basically free to do whatever you want.

How to get started


Start by drawing a basic shape onto your chosen card or paper stock using a fine liner or felt tip pen. Here I used a thick felt pen to draw my basic shape and create a contrast. You can draw free hand or use a shape to draw around. You could even stamp an image if you wanted to.

It might be a good idea to try out a few different patterns on a spare sheet of paper  before you get stuck into you first Zentangle. Here are a few ideas to get you started.


 By starting off with some simple lines you can make some fabulous 3D effects such as these. I'm no expert in this field and I have never had any lessons but these were very easy to draw.


Crossed straight lines can produce stunning chequered patterns and if you make the lines wavy you get a fabulous effect too.


I think the main thing to remember with Zentangle is that it doesn't have to be perfect and you can create any pattern that takes your fancy. The idea is to have fun with it.

Here's one I made for this blog entry. I started by drawing round a cereal bowl using the thick end of my Sharpie pen. After that I added a few wavy lines and started to build my patterns.


And after about half an hour this is the resulting Zentangle which incorporates swirls, spots, straight lines, zig zag lines, scallops and so much more.

It was so relaxing to do and the sense of achievement is great once you have finished and you step back to look at what you have created.

I can totally understand why people do them for fun and relaxation, you can pass away the hours without even noticing it.


Here are a few more that I have created whilst investigating Zentangle:


They aren't master pieces in any shape or form but I think they look great and really effective. If you want to see some fabulous pieces of art be sure to Google "Zentangle" or visit the Zentangle website. I am sure you will be as amazed as I was.


So that is the art of Zentangle I hope you will have fun trying it out and please feel free to send me photo's of your own creations, you can find my email address on my website under contact details.

Thanks for joining me and until next time Happy Crafting :O) x

Related Posts Plugin for WordPress, Blogger...