Graphicus Guild Tag Swap February 2011

This months theme for the Graphicus Guild Tag swap was Romance. Which fits in quite nicely as  we had Valentines Day last week.

This is the gorgeous tag I received from Sheila. She has used Elusive Images stamps and Tim Holtz Distressed inks. 

I love the lace edging to the bottom of the tag.

After the huge tag I made for my first tag swap I managed to scale it down a little for this months Romance swap "lol" . I think the size of the tag is going to be dictated by the stamps I decide to use for that particular challenge.

I don't think it really matters too much what the size is as long as it is a tag.

I wanted to try something new for my tag this time.  So I set about making the background and took 4 different coloured Distressed ink pads and coloured in the page using each one in turn with my cut 'n' dry foam pad. Once I had finished that and let it dry I set about making a fabulous collage using some of my Tim Holtz stamps.

That was quite good fun and something I will definitely be trying again using different stamp sets that I have in my Stash. I can imagine that I will get some great collage background sets.

Once I had made the background and collage it with my stamps I took a  gold pen and a white pen and made some little highlights which made the background come forwards a little. I then stamped my Clarity Stamp Sketchy Lady on to card and added some swirls to her dress in red ink. And then I stamped her into Angelina fibres and put them together with my trusty zig pen.

Whilst that was drying I found some little letter stickers I have had for an absolute age and set out the word love to the bottom left. I covered each letter in Glossy Accents and left that to dry.

Once everything was dry I coloured in the sketchy lady with my promarker skin tones an mounted her onto the tag with silicone glue. I then coloured some string using the 4 distressed inks that I used to make the background, added a heart flower charm and there you have it my finished romance tag. I sent it off to it's new home with Pearl this week and I hope she likes it :O)

Stamped Art Deco Lady Card and Wrap

If you look through my cards you won't really see anything too girly in there as I don't have too many girly type stamps to be honest apart from flowers. I love that grungy arty look more than anything else so I concentate on that style normally.

However, when I saw the Debbie Moore Art Deco Ladies on TV the other week I just had to have them. There is just something about that era I love.

Sadly only one was sent as the other went out of stock :O( But lucky for me the one I did receive was my favourite one so I wasn't too disappointed.

So over the weekend I set to and made this card with a wrap. And although I say so myself I really love it.. as it came out so much better than I imagined it would.

I wanted to try something different for this card so I made a cross over card, with a wrap around.

The little wrap around helps to keep the card closed as well as making it look good too. You can make this from anything you like such as vellum, card, lace, paper. And you can keep it really simple or make it as lavish as you like.

I went for the simple but elegant, using patterned card, black organza ribbon and string of pearly beads. After I took this picture I decided to add a tiny red rose and a Chrystal heart charm which were attached to the bow. Unfortunately I forgot to take another picture - sorry ....

The base card was made from 2 x A5 centura pearl card blanks. The front of each card was scored on the Hougie board to make a diamond pattern before cutting in half.

The half that was removed was then used to decorate the inside of the card fronts and continued the diamond pattern on the inside.The 2 x A5 cards were then stuck together with collall photo glue.

I love this glue as you can rub away the excess if it squishes out the sides, like it always does!!! The inside of the card was matted with Black glitter card and a punched out white glitter card topper.They were stuck together with collall silicon glue to ensure a good bond.

I then stamped the gorgeous Art Deco lady and coloured in the back panel using Sakura Gel pens.And I coloured the ladies skin in using my skin tone and skin accent promarkers.

Now for the fun bit. I took out 2 different colours of Cosmic Shimmer Fusible Film and a tiny bit of Angelina Fibres to create the ladies dress, feathers and hat.

I stamped and ironed the image first in one colour and then with the darker colour I just stamped and ironed the hat and feathers.

These were then cut out and put together over the original stamped figure. The great thing about the fusible film is that you can shape it with your iron. So you can really make the dress look like it has folds in it.

And one of the other unique things about the film is that it changes colour in different light. For example in the image the dress is Pink and Blue. If you turn the card more to the light the dress turns Green, and more to the other side it is a pearly White, it's fabulous...

To attach the film pieces to the original image I used a Zig Glue Pen round the edges. And to finish off I added a few gems to add some sparkle.

I shall definitely be making more cards like this in the future, I just have to hunt for some different art deco stamps...

Thanks for reading & Happy Crafting...

Happy Valentines Day xxx

I just wanted to add a quick message to wish everyone a Happy Valentines Day

I hope you all got lot's of nice flowers, chocolates and cards from those that you love. If not then here is a Valentine from me to you :O) Have a lovely Day xx

That Special Touch of... Mica Masks - Part 2

In my last tutorial I promised to show you how to emboss with you Mica Masks when you don't have an embossing machine such as a Spellbinder Wizard, Cuttlebug or Sizzix Big Shot.

It's quite easy really and the depth of the embossing can be adjusted to your needs quite easily where as with an embossing machine you don't have too much control over the depth of embossing.

Here are the tools you will need for this technique:


  1. A Speedball or other soft rubber brayer.
  2. A dye based ink pad such as a Ranger Big and Juicy.
  3. A Mica Mask of your choice.
  4. Cheap tissues, toilet tissue or shoe box tissue paper.
  5. Card or paper stock.
  6. Cosmic Shimmer Misters or any other Mica Mister or Ink Mister (you can even make your own mister using water and with mica pigment powders or perfect pearls).
  7. Wet Wipes and paper towels for cleaning up afterwards.

 Step 1

Place a sheet of card or paper onto your covered work surface, you don't have to do this but as I hate to waste ink I do this every time. You will create 3 sheets from this one technique.

Now place your chosen Mica Mask on top of the card.

I chose the leaves mask again as it is one of my absolute favourites and it shows this technique really well. You can see all the other masks I have here.

There are 19 different masks to choose from.

Step 2

Cover the the mask with cheap tissues or toilet tissue making sure you create a good layer, n the same way as we did for the last project.

Step 3

Spray a good layer of your chosen cosmic shimmer misters over the tissue and then cover with a piece of card of thick paper.

Once your are happy that you have finished adding your colours place a second piece of paper or card over the top of you tissue paper.


Take your brayer and roll it back and forth over your tissue sandwich applying plenty of pressure.

At this point the initial depth of embossing will be determined by the amount of pressure you apply and how many times you go over the paper with your brayer.


TIP: You can also use a rolling pin if you don't have a brayer.

But don't worry if your not happy with the embossed images depth when you have finished brayering you can apply more depth by using a sponge.

At the same time you can also add other highlights of further colours if you want to.

Once you are happy with your background leave it to dry naturally or you can use your heat gun to dry your paper if your in a hurry.

I like to sit and make a whole load of backgrounds all at once, which is great messy fun, and then I put them away to use at a later date. It saves a lot of time if you are in a hurry and need to make a quick card for someone.

I used this background on one of my Charity cards, the one with the orange toned topper, that you may have seen in my blog update on the 2nd Feb, or you can see the card on my website here.

A couple more cards...

If you follow my blog you will know that I recently started fundraising for Cancer Research and that I have a few items on my website Crazicards that are for sale and a percentage of the profit will be donated to my Cancer Research fund . You can read all about it on my Just Giving Page here.

Things are going well and the shopping trolley tokens have been a hit so far. And as a little thank you I have been sending a little thank you card with every fundraiser item which have also gone down quite well.

Here are a few of the new cards I made ready to go out with the next items that are sold, I try to make each one slightly different is some way.

For the first two I used my Tim Holtz Distressed Ink Pads to create the backgrounds using my trusty cut 'n' dry foam.

I then over stamped with my Creative Expressions British Wild Flowers and Meadow Flora using two different colours of distressed ink before I sprayed gently with water to help defuse the background a little. The more you spray the more the ink will move so it's just a case of playing to see which effect you like best.

Once that had been dried I added a little shimmer to the buttercups and thistle with my Sakura pens just to give the topper some sparkle.

Then I stamped an Elusive Images butterfly onto some shiny card and coloured them in using my Promarkers. For the antenna you can either draw them onto the card as I have or you could use wire or waxed cotton if you have the time.

 
TIP: Use Momento or Adirondack dye based inks for Promarkers and Stazon ink for Aqua markers. Always make sure your initial inked image is completely dry before you start to colour in as the edges may bleed if it's still wet.

You can also emboss the image which will fix it fully, you can then use either type of Promarker to colour in.Once the butterflies were coloured in I covered both of them with Glossy Accents and left them to dry for an hour or so.

Whilst they were drying I used my Rich Gold WOW embossing Powder to highlight the edges of the toppers and sentiments. And once the butterflies were completely dry I cut them out and put the cards together.

For the third card I used the same techniques for the background except I sprinkled the back ground with a little water and dabbed it off to get a speckled effect. And I used one of the gorgeous British Butterflies from Stamps Away.

Sheena Stamps - Watercolours and Pastels

I just love Sheena Douglass don't you?

And I just love her "A Little Bit Sketchy" range of stamps as they give all of us the chance to play with so many different mediums.

 I sat and watched Sheena on Create and Craft the other day full of a cold but still as enthusiastic as ever about what she was showing to the viewers. Bless her...

Anyway in this particular programme Sheena was showing us how to use her stamps with watercolour pencils and chalk pastels. Both of which I have had for absolutely eons and never really used much.

So after being super inspired by Sheena I dug out my pencils and chalks from the dark depths of the spare room, where I keep my stash, and had a little play.

The first picture is coloured with the watercolour pencils and using the Nature Accomplished stamp set. It took me a while but it turned out OK although I say so myself and also considering that I used my cheap watercolour pad which is only 180 gsm. I will definitely use my Bockingford watercolour paper next time as I think the result will definitely be much better.

This second image is also on my cheap watercolour paper using the Milestone and Moments stamp plate and using my chalk pastel pencils to colour it in. This is the first time ever that I have used these pastels and I must admit I wasn't as happy with the results as I was with the watercolour pencils.

But that could be the paper I used I guess and  for a first attempt it's not too bad, practise makes perfect as they say. So next time I shall try the pastels using the right card stock and hopefully the end result will improve with more practise. I would most definitely recommend that you have a go with your watercolour pencils and chalk pastels if you have them, it's really rewarding and I know you will be happy with the end results once you have finished.

Have fun and Happy Crafting :O)

What did you do over the weekend.. I made some paper flowers

So what did you get up to over the weekend?

Besides the usual shopping and tidying up I managed to squeeze in some crafty things. I wanted to have a go at making some different style of flowers which was fun and very addictive (lol).

I have heard a lot of people say that once you start to make them you will not be able to stop. And now I know why they say that, as I really enjoyed making the flowers because I managed to get rather messy, like you do....

Here's a few of the ones I made:

This is the first rose I made using my Tim Holtz Tattered Floral dies with watercolour paper. I used this type of paper as I wanted to see what effect the ink would have from the Tim Holtz Distressed Inks and Cosmic Shimmer Mister Sprays.

To get this effect I simply sprayed Cosmic Shimmer Ocean Sunlight onto my craft mat and sprayed with a little water. I them spread the ink over the craft mat with my hand before adding my flowers.

I was quite happy as the ink soaked in to the paper in a kind of tie dyed way but you can't really see that from my photo. The only problem I had with the watercolour paper was that it is very fragile when wet.

Once the paper has been sprayed and dried it is quite stiff which is great for these flowers and you can shape the petal quite well. You just need to remember to cut in between each of the petals so that they don't tare when you stick and shape them.

Once this rose was dry I sprayed it again with a Cosmic Shimmer Mister which from memory was the  Sunlight Mist.

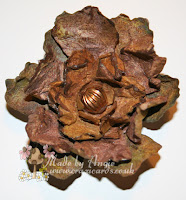
I also had a play with the rest of Tim Holtz Tattered Floral dies and made this fabulous flower using two of the large flowers and the same two  medium flowers as I used for my roses.

Again I decided to use the watercolour paper for this flower and I used Tim Holtz Distressed Inks Vintage Photo, Scattered Straw with a hint of Spiced Marmalade, and the Bronze Blush Cosmic Shimmer Mister to finish off with. Sounds like a 3 course meal doesn't it ...

To ink the flowers I simply dabbed my ink pads onto my craft mat and then added water, one colour at a time.

This was by far the messiest one to make as I scrunched the flowers up once I had finished inking them up. So I would suggest that you wear some rubber gloves to protect your hands before you start to play.  Again once the flowers were dry I sprayed them very lightly with the Bronze Cosmic Shimmer Mister spray and then dragged the petal edges through the excess spray left on the craft mat.

Once dried I glued them together with my hot glue gun, the two large petals first followed by the two medium flowers and I added a nice fancy metal bead I had in my stash for the centre. I really like the look of this flower and will most definitely be making a few more of these in different colours. The only thing to remember with this particular type of flower is that it is quite big at 2.5 to 3 inches across.

You can alter the width slightly when you put it together as long as the flowers are still damp. You can spray it with water to re-shape it if you want to after you have glued it together

And this is the third flower I made. For this one I dabbed my Chipped Sapphire distressed ink pad onto my craft mat and sprayed it with water. I then spread the ink over the craft mat before adding my flowers. This gave a much deeper covering to the flowers which was really quite vibrant before the flowers dried. (Once the flowers dried they had a more distressed look to them which is great).

Once the flowers had been dried off using my heat gun I stamped them all over with the word "bloom" in silver ink. And once I put the rose together I dragged the petal edges through the silver in pad and also a little gold.

I just love these roses and they are perfect for adding to your cards, boxes and photo frames. If you haven't had a go at making these yourself yet I really suggest you do give them a go, you will be really glad that you did, and once you get the hang of it you will know doubt have a big box full of many different types and styles of paper flowers that you can use on all your projects.

Tomorrow I will show you the two stamped Sheena images I had a play with over the weekend. I have never used watercolour paints or pastel chalks along side my stamping so this was something new to try and it turned out ok for a first go ...lol..

So until tomorrow....happy crafting :O)
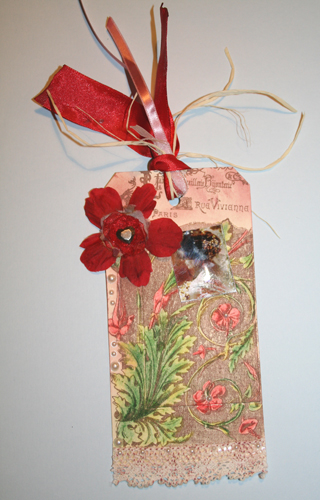
That Special Touch of... Mica Masks - More Cards

Well I am really thrilled to say that the card that I made during my tutorial sold instantly.  A "BIG" thank you goes out to Mrs S Buchanan,  from Kent, for her generous donation, I really appreciate your support. It means a lot to me and Cancer Research.

Luckily I did make a couple of extra cards and I have now added them to my Fundraising page on my website here.

Here they are:

This is an A5 Portrait card. Again using the Mica Mask leaves background but this time i used darker Cosmic Shimmer Mists to give a more earthy feel to the card.

I really love this Elusive Images tall trees stamp plate, it has a fabulous oriental feel to it. And the verse is just perfect for this scheme.

It reads:

A tree is known by it's fruit,
A man by his deeds,
A good deed is never lost,
He who sows courtesy reaps friendship,
And he who plants kindness gathers love.

Here is the second card I made which is also an A5 card but in landscape this time. 

For this one I made a similar background to the first card using much  lighter cosmic shimmer mists and I used more earth tones in the card stock to give that woody forest feel.

If you would like to support my efforts to raise money for Cancer Research you can do so by visiting my website where I have shopping trolley tokens, specially selected craft items each month and my handmade cards for sale. 

If you prefer to donate directly you can also visit my Just Giving web page where you can read my story, check on my progress and make a donation if you want to.

Thanks for reading and have a lovely day :O) x 


That Special Touch of... Mica Masks - Part 1

I just love these Mica Masks from That Special Touch Of...

They are just so versatile, you can run them almost any type of embossing machine such as the Spellbinder Wizard or cuttlebug. Check your machines instructions if your not sure on how to build your embossing sandwich.

You can ink your mask using dye based inks and use them to print onto your card, fabric, paper and vellum etc..  

Top Tip: Stazon Ink and permanent pigment Inks may mark you masks. You can still use them once they are dry but you have to ensure your mask is thoroughly dry and clean before using on a new project.

You can use them for dry embossing as you would with your normal embossing folders or you can use them for wet embossing using Cosmic Shimmer Misters, Tim Holtz Distressed Inks and even craft pastes.

Infact there are so many things that you can do with your Mica Masks it's incredible. And one of their best features is that once you have finished getting all messy you just need to throw them into a bowl of warm soapy water and give them a wash and your ready to start over.

One of my favourite ways to use my Mica Masks is to create embossed backgrounds using Cosmic Shimmer Misters and tissue paper. Here's a card with an embossed background which I made for my February Cancer Research Charity Fundraiser Project using this technique.


Here's how I did it:

Tools you will need : -  Your Mica Masks, an embossing machine, cheap tissues or toilet paper, ink misters, Mica misters or for a more natural look a plain water mister.

And to clean up afterwards wet wipes and paper towels.

You can also create this effect without an embossing machine by using a soft brayer and a sponge but I will save that technique for next time....

Step 1

Choose your mask and the misters you want to use for your project. For my project I used Cosmic Shimmer Rich Gold and Golden Mint. And I selected the Leaves Mica Mask which is one of my favourites.

Step 2

Place your mask onto the base plate of your embossing machine and cover with tissue paper, make sure you get plenty on there but not too much as this will be difficult to run through your embossing machine.


Step 3

Take your Cosmic Shimmer misters and spray the tissue paper making sure that you get plenty on there. You can add as many colours as you like but for this project I chose just the two colours.

Tip: If you don't have ready made misters you can either make your own using perfect pearls or you can use just plain water for a more natural appearance.

When your happy place a sheet of card or paper over the tissue paper followed by your embossing mat and then your top plate.
If you don't have a wizard machine you will need to follow the instructions you have for your machine to get the sandwich in the correct order.

When your happy place a sheet of card or paper over the tissue paper followed by your embossing mat and then your top plate.

If you don't have a wizard you will need to follow the instructions you have for your machine to get the right sandwich.

TIP: I place the card or paper between to prevent my rubber embossing mat and top plate from getting covered in ink. At the same time you will get a sheet that is also embossed and inked. You can use that sheet on another project.

Step 4

Run the sandwich through your embossing machine. And when done place the mask and tissue paper to one side until it dries. Don't be tempted to try and peel the tissue paper away as this will separate the sheets from each other.


Step 5

When the tissue paper is dry remove the mask and there you have it a lovely embossed piece to use as a centre piece or a background.

This is the piece I used for the card at the beginning of this tutorial.

There are many other ways to use them as I mentioned before, one other particular favourite of mine is the use of modeling paste or craft paste but that's will have to keep until another time.

So there you have it, just one simple way to use you Mica Masks and my first tutorial. I hope you have enjoyed it and I would love to hear your comments good or bad and if you have any suggestions for another project or you would like to contribute please feel free to contact me.

Don't forget to join me next time for how to create this same effect but without an embossing machine.

Join my mailing list at www.Crazicards.co.ukand be notified of new projects and new products on a fortnightly basis.

Thanks for reading and have a great week.

Related Posts Plugin for WordPress, Blogger...